Saturday, February 21, 2015

Phabricator – An Open Source Powerful Project Management Tool for Linux

Linux Directory Structure and Important Files Paths Explained

For any person, who does not have a sound knowledge of Linux Operating System and Linux File System, dealing with the files and their location, their use may be horrible, and a newbie may really mess up.

This article is aimed to provide the information about Linux File System, some of the important files, their usability and location.

Linux Directory Structure Diagram

A standard Linux distribution follows the directory structure as provided below with Diagram and explanation.

Linux File System Structure

Linux Directory Structure
Each of the above directory (which is a file, at the first place) contains important information, required for booting to device drivers, configuration files, etc. Describing briefly the purpose of each directory, we are starting hierarchically.
  1. /bin : All the executable binary programs (file) required during booting, repairing, files required to run into single-user-mode, and other important, basic commands viz., cat, du, df, tar, rpm, wc, history, etc.
  2. /boot : Holds important files during boot-up process, including Linux Kernel.
  3. /dev : Contains device files for all the hardware devices on the machine e.g., cdrom, cpu, etc
  4. /etc : Contains Application’s configuration files, startup, shutdown, start, stop script for every individual program.
  5. /home : Home directory of the users. Every time a new user is created, a directory in the name of user is created within home directory which contains other directories like Desktop, Downloads, Documents, etc.
  6. /lib : The Lib directory contains kernel modules and shared library images required to boot the system and run commands in root file system.
  7. /lost+found : This Directory is installed during installation of Linux, useful for recovering files which may be broken due to unexpected shut-down.
  8. /media : Temporary mount directory is created for removable devices viz., media/cdrom.
  9. /mnt : Temporary mount directory for mounting file system.
  10. /opt : Optional is abbreviated as opt. Contains third party application software. Viz., Java, etc.
  11. /proc : A virtual and pseudo file-system which contains information about running process with a particular Process-id aka pid.
  12. /root : This is the home directory of root user and should never be confused with ‘/
  13. /run : This directory is the only clean solution for early-runtime-dir problem.
  14. /sbin : Contains binary executable programs, required by System Administrator, for Maintenance. Viz., iptables, fdisk, ifconfig, swapon, reboot, etc.
  15. /srv : Service is abbreviated as ‘srv‘. This directory contains server specific and service related files.
  16. /sys : Modern Linux distributions include a /sys directory as a virtual filesystem, which stores and allows modification of the devices connected to the system.
  17. /tmp :System’s Temporary Directory, Accessible by users and root. Stores temporary files for user and system, till next boot.
  18. /usr : Contains executable binaries, documentation, source code, libraries for second level program.
  19. /var : Stands for variable. The contents of this file is expected to grow. This directory contains log, lock, spool, mail and temp files.

Exploring Important file, their location and their Usability

Linux is a complex system which requires a more complex and efficient way to start, stop, maintain and reboot a system unlike Windows. There is a well defined configuration files, binaries, man pages, info files, etc. for every process in Linux.
  1. /boot/vmlinuz : The Linux Kernel file.
  2. /dev/hda : Device file for the first IDE HDD (Hard Disk Drive)
  3. /dev/hdc : Device file for the IDE Cdrom, commonly
  4. /dev/null : A pseudo device, that don’t exist. Sometime garbage output is redirected to /dev/null, so that it gets lost, forever.
  5. /etc/bashrc : Contains system defaults and aliases used by bash shell.
  6. /etc/crontab : A shell script to run specified commands on a predefined time Interval.
  7. /etc/exports : Information of the file system available on network.
  8. /etc/fstab : Information of Disk Drive and their mount point.
  9. /etc/group : Information of Security Group.
  10. /etc/grub.conf : grub bootloader configuration file.
  11. /etc/init.d : Service startup Script.
  12. /etc/lilo.conf : lilo bootloader configuration file.
  13. /etc/hosts : Information of Ip addresses and corresponding host names.
  14. /etc/hosts.allow : List of hosts allowed to access services on the local machine.
  15. /etc/host.deny : List of hosts denied to access services on the local machine.
  16. /etc/inittab : INIT process and their interaction at various run level.
  17. /etc/issue : Allows to edit the pre-login message.
  18. /etc/modules.conf : Configuration files for system modules.
  19. /etc/motd : motd stands for Message Of The Day, The Message users gets upon login.
  20. /etc/mtab : Currently mounted blocks information.
  21. /etc/passwd : Contains password of system users in a shadow file, a security implementation.
  22. /etc/printcap : Printer Information
  23. /etc/profile : Bash shell defaults
  24. /etc/profile.d : Application script, executed after login.
  25. /etc/rc.d : Information about run level specific script.
  26. /etc/rc.d/init.d : Run Level Initialisation Script.
  27. /etc/resolv.conf : Domain Name Servers (DNS) being used by System.
  28. /etc/securetty : Terminal List, where root login is possible.
  29. /etc/skel : Script that populates new user home directory.
  30. /etc/termcap : An ASCII file that defines the behaviour of Terminal, console and printers.
  31. /etc/X11 : Configuration files of X-window System.
  32. /usr/bin : Normal user executable commands.
  33. /usr/bin/X11 : Binaries of X windows System.
  34. /usr/include : Contains include files used by ‘c‘ program.
  35. /usr/share : Shared directories of man files, info files, etc.
  36. /usr/lib : Library files which are required during program compilation.
  37. /usr/sbin : Commands for Super User, for System Administration.
  38. /proc/cpuinfo : CPU Information
  39. /proc/filesystems : File-system Information being used currently.
  40. /proc/interrupts : Information about the current interrupts being utilised currently.
  41. /proc/ioports : Contains all the Input/Output addresses used by devices on the server.
  42. /proc/meminfo : Memory Usages Information.
  43. /proc/modules : Currently using kernel module.
  44. /proc/mount : Mounted File-system Information.
  45. /proc/stat : Detailed Statistics of the current System.
  46. /proc/swaps : Swap File Information.
  47. /version : Linux Version Information.
  48. /var/log/lastlog : log of last boot process.
  49. /var/log/messages : log of messages produced by syslog daemon at boot.
  50. /var/log/wtmp : list login time and duration of each user on the system currently.
Source : http://www.tecmint.com


Thursday, August 28, 2014

How to install Cisco VPN client on Ubuntu

This tutorial shows you how to install Cisco VPN on Ubuntu 13.04 Raring or 13.10 Saucy. You don’t have to do anything special to install Cisco VPN client, because network manager supports Cisco IPSec VPNs after installed the vpnc plugin.

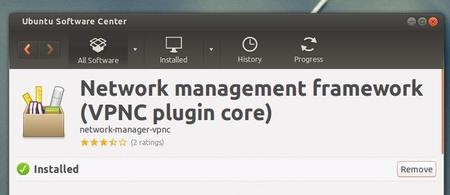
To get started, search for and install network-manager-vpnc package from Ubuntu Software Center. It installs the Cisco-compatible VPN client as well as the plugin for network manager.

Cisco VPN for network manager

Once installed, you can follow below steps to setup Cisco VPN for Ubuntu:

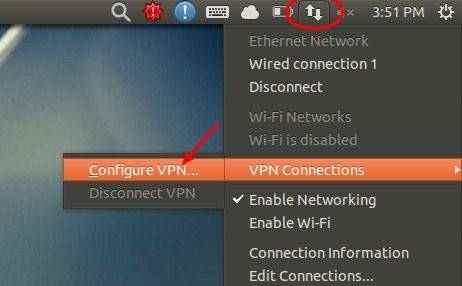
1.) Move your cursor to right-top corner system tray area, click on Network Manager icon and choose VPN Connections -> Configure VPN

setup Cisco VPN for Ubuntu

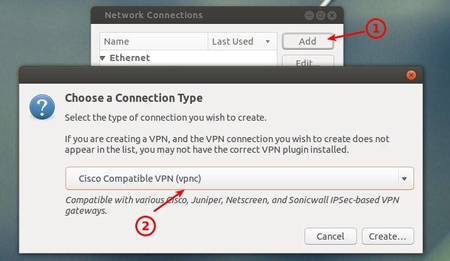
2.) In next window, click on Add button to add a new connection and then choose Cisco Compatible VPN (vpnc) from the drop-down menu.

setup cisco vpn connection

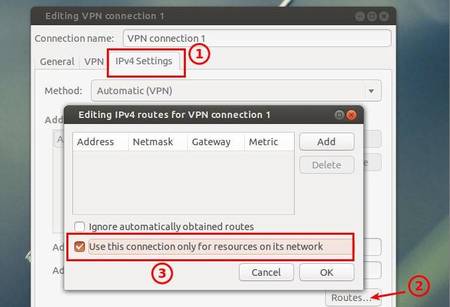
3.) Click on Create and you’re able to type in your Cisco VPN details in next window. After all, check off “Use this connection only for resources on its network” otherwise your traffic significantly slowed down

configure cisco vpn connection

Tuesday, August 12, 2014

Security Tip: Disable Root SSH Login on Linux

One of the biggest security holes you could open on your server is to allow directly logging in as root through ssh, because any cracker can attempt to brute force your root password and potentially get access to your system if they can figure out your password.

It’s much better to have a separate account that you regularly use and simply sudo to root when necessary. Before we begin, you should make sure that you have a regular user account and that you can su or sudo to root from it.
To fix this problem, we’ll need to edit the sshd_config file, which is the main configuration file for the sshd service. The location will sometimes be different, but it’s usually in /etc/ssh/. Open the file up while logged on as root.
vi /etc/ssh/sshd_config
Find this section in the file, containing the line with “PermitRootLogin” in it.
#LoginGraceTime 2m
#PermitRootLogin no
#StrictModes yes
#MaxAuthTries 6

Make the line look like this to disable logging in through ssh as root.

PermitRootLogin no
Now you’ll need to restart the sshd service:

/etc/init.d/sshd restart
Now nobody can brute force your root login, at least.

Thursday, May 8, 2014

Installing Guest additions from the repositories

In case we have installed the OSE edition of Virtual Box from the repositories we can add the guest additions from the repositories.

Install the package virtualbox-guest-additions-iso Install virtualbox-guest-additions-iso in the host Ubuntu. The .iso file with an image of the OSE edition of the guest additions CD will install in the host directory /usr/share/virtualbox/VBoxGuestAdditions.iso. Mount this .iso file as a CD in your virtual machine's settings. In the guest you will then have access to a CD-ROM with the installer.

Installing Guest Additions from Virtual Box Manager

In case the Guest Additions fail to build we may have to install the Linux kernel headers (see How do I install kernel header files?) or build-essential Install build-essential tools in addition. It is also recommended to have dkms Install dkms installed
(see below - Note 4).

Selecting Devices -> Install Guest Additions (or press Host+D from the Virtual Box Manager) the Guest Additions CD .iso will be loaded but not installed in your guest OS. To install we need to run the installer script VBoxLinuxAdditions.run as root or from the Autorun Prompt (see below),

GNOME classic

To install the Guest Additions we will have a CD icon on our desktop as soon as the virtual drive is mounted:

alt text

Next step is to run the autorun.sh script (as root) on this mounted CD either by opening the drive or by choosing "Open With Autorun Prompt" from the right-click context menu as depicted above. This will build and install the vbox kernel modules needed

Unity

The guest additions is mounted as a virtual CD visible on the launcher:
enter image description here
In case the system is set up to autorun a CD it should just open the following autorun dialogue (if not select the CD symbol, choose open, then choose Open Autorun Prompt)

enter image description here

After having entered your credentials for root access the guest additions will build as seen from the terminal output:

enter image description here
Press Return to close the terminal.
Note 1
Guest Additions need a reboot of your guest OS to take effect.

Note 2
In some systems the Virtual Box Guest Additions CD icon may not be shown on the desktop, but will be accessible from the Places menu. If the CD still was not there you may have to manually add the VBoxGuestAdditions.iso as a CD-ROM in the Virtual Box Manager Storage menu. In an Ubuntu host the disk image is in /usr/share/virtualbox/VBoxGuestAdditions.iso.
Note 3
In some systems (e.g. when running Xubuntu guests) we may not have an Autorun Prompt for the mounted CD. Then we can install the guest additions by opening a terminal on the mounted guest additions .iso to run sudo ./VBoxLinuxAdditions.run. In Lubuntu guests we additionally need to install the GNU C compiler (gcc Install gcc) and the make Install make utility in the guest system to be able to compile the guest additions.
Note 4
Running DKMS in the guest OS will keep Guest Additions installed after a guest kernel update. It is not a prerequisite for Guest Additions but if used it should be installed before we install the Guest Additions.

Installing Guest Additions from a Terminal

In case Guest Additions are not installed properly we may not be able to boot to the GUI. In this case we need to boot holding the Shift key to access the Grub menu where we access a root shell as depicted in the following question (we do need to mount the filesystem read/write to proceed):
The Guest Additions .iso file needs to be installed on /dev/cdrom from the Virtual Box Manager (see above). We then may install Guest Additions by typing the following commands:
mount /dev/cdrom /mnt              # or any other mountpoint
cd /mnt
./VBoxLinuxAdditions.run
reboot

Remove Guest Additions

In case something went wrong with installing the guest additions, or the guest OS can not boot after installing we may have to remove the additions. This can be done by running an uninstallation script located in the guest /opt directory.
cd /opt/<VirtualBoxAdditions-x.x.xx>/
sudo ./uninstall.sh
Replace x.x.xx with your current version of guest additions.

Monday, April 28, 2014

ASCII Art for your SSH logins

Here is a nice way to spice up your SSH logins.
To create a cool ASCII art banner for your server, first start off by going here:

http://www.network-science.de/ascii/

Type your server name into the text field. On the font choice, select “_all fonts with your text_”. Click OK to generate the ASCII art. Copy the one you like into the clipboard.

On your server, paste this into the file /etc/banner

Edit /etc/ssh/sshd_config and change the “Banner” directive to
“Banner /etc/banner”

Restart SSH

Screen Command Examples to Manage Linux Terminals

Screen is a full-screen software program that can be used to multiplexes a physical console between several processes (typically interactive shells). It offers a user to open several separate terminal instances inside a one single terminal window manager.
The screen application is very useful, if you are dealing with multiple programs from a command line interface and for separating programs from the terminal shell. It also allows you to share your sessions with others users and detach/attach terminal sessions.
 
 
Screen Command Examples

On my Ubuntu 10.04 Server Edition, Screen has been installed by default. But, in Linux Mint does not have screen installed by default, I need to install it first using apt-get command before using it. Please follow your distribution installation procedure to install screen.
 
# apt-get install screen (On Debian based Systems)
# yum install screen (On RedHat based Systems)

Actually, Screen is a very good command in Linux which is hidden inside hundreds of Linux commands. Let’s start to see the function of Screen.

Start screen for the first time

Just type screen at the command prompt. Then the screen will show with interface exactly as the command prompt.
 
pungki@mint ~ $ screen

Show screen parameter

When you enter the screen, you can do all your work as you are in the normal CLI environment. But since the screen is an application, so it have command or parameters.
Type “Ctrl-A” and “?” without quotes. Then you will see all commands or parameters on screen.
 Screen key bindings, page 1 of 1.
 Command key:  ^A   Literal ^A:  a

  break       ^B b         flow        ^F f         lockscreen  ^X x         pow_break   B            screen      ^C c         width       W
  clear       C            focus       ^I           log         H            pow_detach  D            select      '            windows     ^W w
  colon       :            hardcopy    h            login       L            prev        ^H ^P p ^?   silence     _            wrap        ^R r
  copy        ^[ [         help        ?            meta        a            quit        \            split       S            writebuf    >
  detach      ^D d         history     { }          monitor     M            readbuf     <            suspend     ^Z z         xoff        ^S s
  digraph     ^V           info        i            next        ^@ ^N sp n   redisplay   ^L l         time        ^T t         xon         ^Q q
  displays    *            kill        K k          number      N            remove      X            title       A
  dumptermcap .            lastmsg     ^M m         only        Q            removebuf   =            vbell       ^G
  fit         F            license     ,            other       ^A           reset       Z            version     v

^]  paste .
"   windowlist -b
-   select -
0   select 0
1   select 1
2   select 2
3   select 3
4   select 4
5   select 5
6   select 6
7   select 7
8   select 8
9   select 9
I   login on
O   login off
]   paste .

To get out of the help screen, you can press “space-bar” button or “Enter“. (Please note that all shortcuts which use “Ctrl-A” is done without quotes).

Detach the screen

One of the advantages of screen that is you can detach it. Then, you can restore it without losing anything you have done on the screen. Here’s the sample scenario:

You are in the middle of SSH-on your server. Let’s say that you are downloading 400MB patch for your system using wget command.

The download process is estimated to take 2 hours long. If you disconnect the SSH session, or suddenly the connection lost by accident, then the download process will stop. You have to start from the beginning again. To avoid that, we can use screen and detach it.

Take a look at this command. First, you have to enter the screen.
 
pungki@mint ~ $ screen

Then you can do the download process. For examples on my Linux Mint, I am upgrading my dpkg package using apt-get command.
 
pungki@mint ~ $ sudo apt-get install dpkg
Sample Output
Reading package lists... Done
Building dependency tree      
Reading state information... Done
The following packages will be upgraded:
  dpkg
1 upgraded, 0 newly installed, 0 to remove and 1146 not upgraded.
Need to get 2,583 kB of archives.
After this operation, 127 kB of additional disk space will be used.
Get:1 http://debian.linuxmint.com/latest/ testing/main dpkg i386 1.16.10 [2,583 kB]
47% [1 dpkg 1,625 kB/2,583 kB 47%]                                        14,7 kB/s

While downloading in progress, you can press “Ctrl-A” and “d“. You will not see anything when you press those buttons. The output will be like this:
 
[detached from 5561.pts-0.mint]
pungki@mint ~ $

Re-attach the screen

After you detach the screen, let say you are disconnecting your SSH session and going home. In your home, you start to SSH again to your server and you want to see the progress of your download process. To do that, you need to restore the screen. You can run this command:
 
pungki@mint ~ $ screen -r

And you will see that the process you left is still running.
When you have more than 1 screen session, you need to type the screen session ID. Use screen -ls to see how many screen are available.
 
pungki@mint ~ $ screen -ls
Sample Output
pungki@mint ~ $ screen -ls
There are screens on:
        7849.pts-0.mint (10/06/2013 01:50:45 PM)        (Detached)
        5561.pts-0.mint (10/06/2013 11:12:05 AM)        (Detached)
2 Sockets in /var/run/screen/S-pungki

If you want to restore screen 7849.pts-0.mint, then type this command.
pungki@mint ~ $ screen -r 7849

Using Multiple Screen

When you need more than 1 screen to do your job, is it possible? Yes it is. You can run multiple screen window at the same time. There are 2 (two) ways to do it.

First, you can detach the first screen and the run another screen on the real terminal. Second, you do nested screen.

Switching between screens

When you do nested screen, you can switch between screen using command “Ctrl-A” and “n“. It will be move to the next screen. When you need to go to the previous screen, just press “Ctrl-A” and “p“.
To create a new screen window, just press “Ctrl-A” and “c“.

Logging whatever you do

Sometimes it is important to record what you have done while you are in the console. Let say you are a Linux Administrator who manage a lot of Linux servers.

With this screen logging, you don’t need to write down every single command that you have done. To activate screen logging function, just press “Ctrl-A” and “H“. (Please be careful, we use capital ‘H’ letter. Using non capital ‘h’, will only create a screenshot of screen in another file named hardcopy).

At the bottom left of the screen, there will be a notification that tells you like: Creating logfile “screenlog.0“. You will find screenlog.0 file in your home directory.

This feature will append everything you do while you are in the screen window. To close screen to log running activity, press “Ctrl-A” and “H” again.
Another way to activate logging feature, you can add the parameter “-L” when the first time running screen. The command will be like this.
 
pungki@mint ~ $ screen -L

Lock screen

Screen also have shortcut to lock the screen. You can press “Ctrl-A” and “x” shortcut to lock the screen. This is handy if you want to lock your screen quickly. Here’s a sample output of lock screen after you press the shortcut.
 
Screen used by Pungki Arianto  on mint.
Password:

You can use your Linux password to unlock it.

Add password to lock screen

For security reason, you may want to put the password to your screen session. A Password will be asked whenever you want to re-attach the screen. This password is different with Lock Screen mechanism above.

To make your screen password protected, you can edit “$HOME/.screenrc” file. If the file doesn’t exist, you can create it manually. The syntax will be like this.
 
password crypt_password

To create “crypt_password” above, you can use “mkpasswd” command on Linux. Here’s the command with password “pungki123“.
 
pungki@mint ~ $ mkpasswd pungki123
l2BIBzvIeQNOs

mkpasswd will generate a hash password as shown above. Once you get the hash password, you can copy it into your “.screenrc” file and save it. So the “.screenrc” file will be like this.
 
password l2BIBzvIeQNOs

Next time you run screen and detach it, password will be asked when you try to re-attach it, as shown below:
 
pungki@mint ~ $ screen -r 5741
Screen password:

Type your password, which is “pungki123” and the screen will re-attach again.

After you implement this screen password and you press “Ctrl-A” and “x” , then the output will be like this.
 
Screen used by Pungki Arianto  on mint.
Password:
Screen password:

A Password will be asked to you twice. First password is your Linux password, and the second password is the password that you put in your .screenrc file.

Leaving Screen

There are 2 (two) ways to leaving the screen. First, we are using “Ctrl-A” and “d” to detach the screen. Second, we can use the exit command to terminating screen. You also can use “Ctrl-A” and “K” to kill the screen.

That’s some of screen usage on daily basis. There are still a lot of features inside the screen command. You may see screen man page for more detail.